


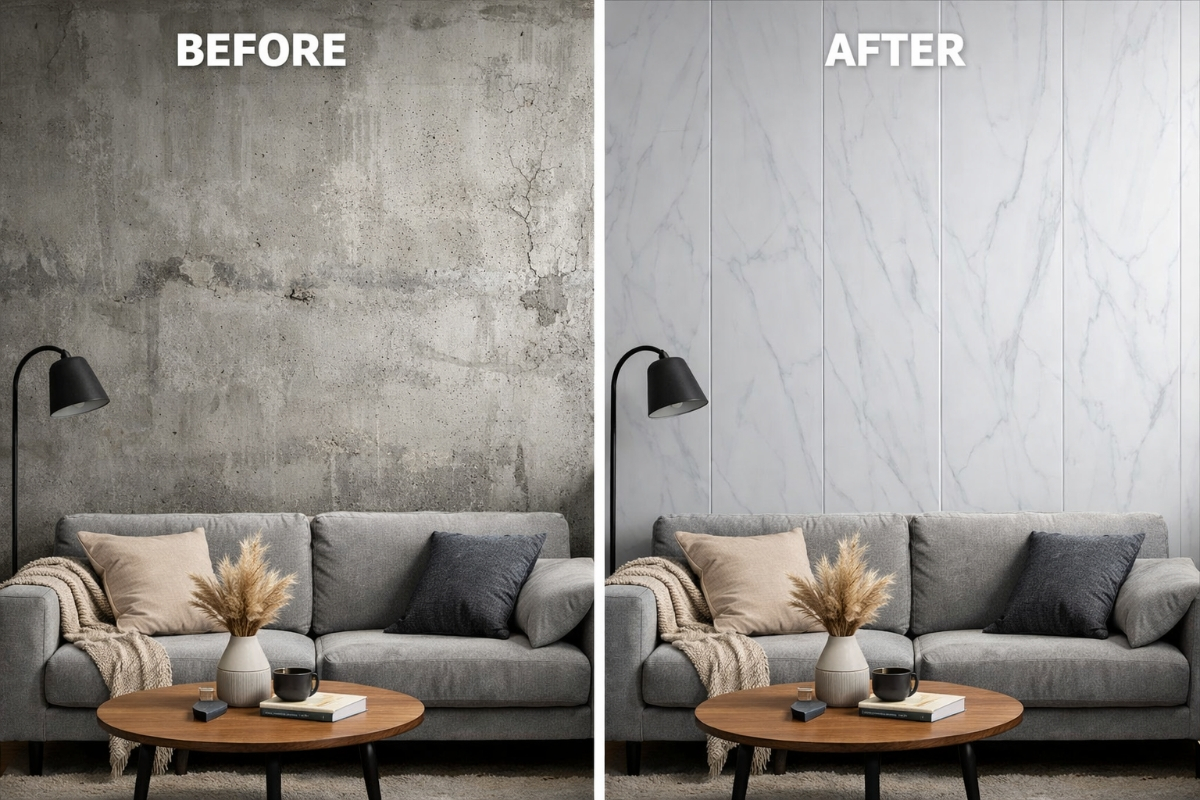
Transforming tired bathroom or kitchen walls doesn’t have to mean weeks of messy tiling work or expensive professional installation. PVC wall panels have revolutionised home improvement across the UK, offering homeowners a practical, cost-effective alternative that delivers professional results in a fraction of the time.
Whether you’re tackling a weekend DIY project or planning a full room renovation, this comprehensive guide will walk you through everything you need to know about installing PVC wall panels successfully.
From understanding the benefits and choosing the right materials to following our detailed step-by-step installation process, you’ll discover why thousands of UK homeowners are choosing PVC panels for bathrooms, kitchens, and wet rooms. Let’s explore how you can achieve a stunning, water-resistant wall finish that will last for decades.
What Are PVC Wall Panels?
PVC (polyvinyl chloride) wall panels are lightweight, durable sheets designed to cover and protect interior walls. These panels typically measure between 2.4 and 3 metres in length and come in widths ranging from 250mm to 500mm, though dimensions vary by manufacturer. In the UK market, you’ll find PVC panels in numerous finishes including glossy white, matt colours, tile-effect designs, marble patterns, and even wood-grain effects.
The panels feature a tongue-and-groove interlocking system that creates seamless joins when properly installed. Unlike traditional PVC cladding used externally, interior wall panels are specifically engineered for indoor applications with a focus on aesthetics and water resistance. They’re particularly popular as a tiling alternative in bathrooms and kitchens, where their 100% waterproof properties and easy-clean surfaces offer distinct advantages.
Modern PVC wall panels are typically 8-10mm thick, providing sufficient rigidity whilst remaining easy to cut and install. The material’s cellular structure makes panels lightweight yet strong, and the non-porous surface prevents moisture penetration—a critical feature in high-humidity environments common in British homes.
Key Benefits of PVC Wall Panels
Durability and Longevity
Quality PVC wall panels can last 15-20 years or more when properly installed and maintained. Unlike painted surfaces that require regular refreshing or tiles that can crack and discolour, PVC panels retain their appearance throughout their lifespan. They resist impact damage, won’t chip like ceramic tiles, and maintain their structural integrity even in high-moisture environments. This longevity makes them an excellent investment for UK homeowners looking for a long-term solution.
Water Resistance
The waterproof nature of PVC panels makes them ideal for British bathrooms, shower enclosures, and kitchens. Unlike plasterboard that can deteriorate when exposed to moisture, or grout lines that harbour mould and mildew, PVC panels create a completely sealed barrier when correctly installed with appropriate sealant. This moisture resistance is particularly valuable in the UK’s damp climate, where bathroom ventilation can be challenging and condensation is a common concern.
Easy Installation
One of the most appealing aspects of PVC wall panels is their DIY-friendly installation process. Unlike tiling, which requires specialist skills, precise spacing, grouting, and extended drying times, PVC panels can be installed by competent DIYers in a single day. The tongue-and-groove system guides panel alignment, and the lightweight material is easy to handle and cut. This accessibility means significant savings on labour costs whilst still achieving professional-looking results.
Low Maintenance
PVC panels require minimal upkeep compared to traditional wall finishes. There’s no grouting to clean or reseal, no paint to touch up, and no special treatments needed. A simple wipe with a damp cloth and mild detergent keeps panels looking pristine. The non-porous surface prevents soap scum, limescale, and mould from taking hold—common problems with tiled surfaces in UK bathrooms. This low-maintenance characteristic saves both time and money over the panels’ lifetime.
Cost-Effectiveness
When comparing total project costs, PVC panels often prove more economical than tiling. The materials themselves are competitively priced, typically ranging from £10-£30 per square metre depending on design and quality. Installation costs are lower—whether DIY or professionally fitted—due to the simpler, faster process. Additionally, the elimination of grout, tile adhesive, and lengthy labour charges contributes to overall savings. Long-term cost benefits include reduced maintenance expenses and the absence of redecoration requirements.
Where Are PVC Wall Panels Commonly Used?
PVC wall panels have gained widespread popularity across several countries, each embracing the technology for specific reasons:
United Kingdom: British homeowners favour PVC panels primarily for bathroom and kitchen renovations, particularly in older properties where damp issues are prevalent. The panels’ moisture resistance and ability to be installed over existing tiles makes them ideal for updating tired spaces without extensive demolition work.
Australia: In Australia’s humid coastal regions, PVC panels are popular for their resistance to moisture and salt air. They’re commonly used in beachside properties, laundry rooms, and outdoor bathrooms where traditional materials struggle with the climate.
United States: Americans frequently use PVC panels for basement finishing, commercial washrooms, and food preparation areas. The panels meet commercial hygiene standards and offer a practical solution for below-grade spaces prone to moisture issues.
European Countries: Germany, the Netherlands, and Scandinavian nations have embraced PVC panels for their sustainability credentials and practical benefits. These markets particularly value the long lifespan and recyclability of PVC products, alongside their thermal insulation properties that contribute to energy efficiency.
Tools and Materials Required
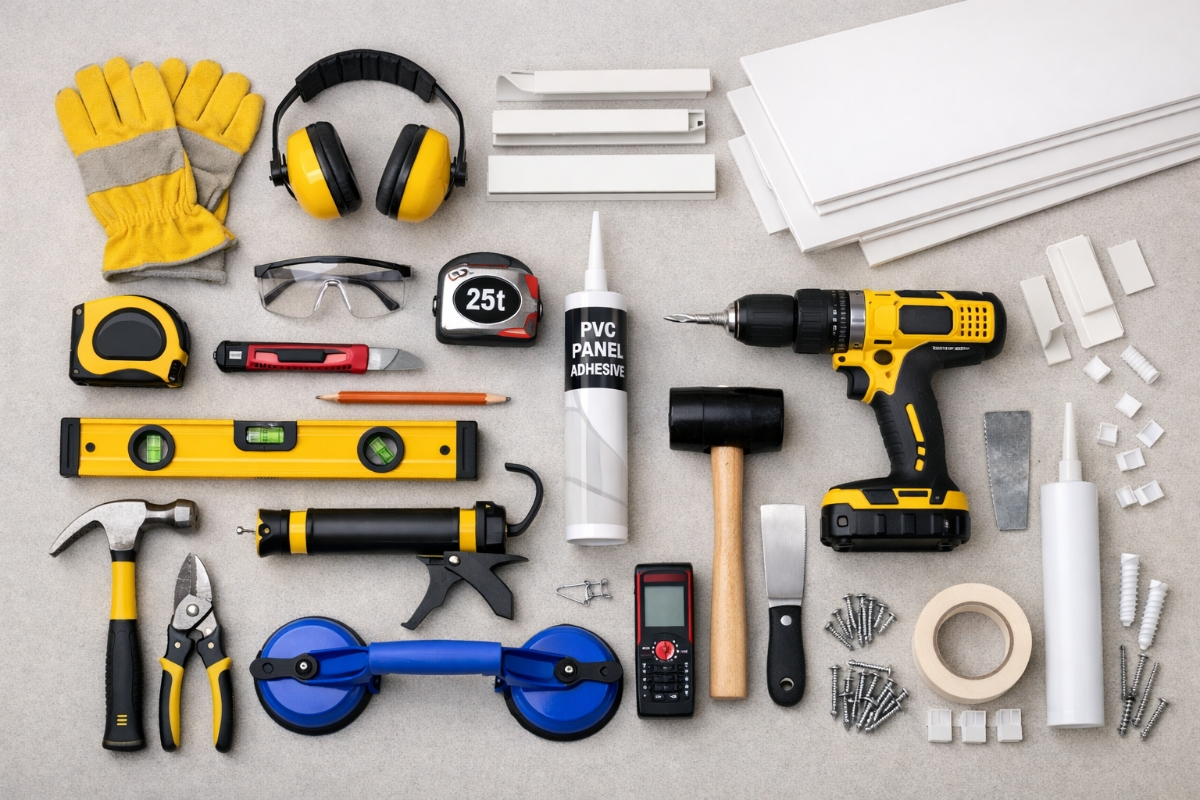
Essential Tools
Before starting your installation, gather these necessary tools:
- Spirit level (minimum 1 metre) for ensuring perfectly vertical and horizontal lines
- Tape measure and metal ruler for accurate measurements
- Fine-toothed saw or circular saw for clean panel cuts (minimum 18 teeth per inch)
- Adhesive gun for applying panel adhesive evenly
- Pencil for marking cutting lines and fixing points
- Utility knife for trimming and scoring
- Safety equipment: protective eyewear, dust mask, and work gloves
Materials Needed
- PVC wall panels: Calculate your square meterage plus 10% extra for cuts and wastage
- Panel adhesive: Choose waterproof adhesive suitable for bathrooms (typically 1 tube covers 1-2 square metres)
- Finishing trims: Internal corners, external corners, end caps, and starting trim
- Silicone sealant: Waterproof variety for bathrooms and kitchens
- Optional battens: If not using adhesive method
Pre-Installation Preparation
Surface Assessment
Proper preparation determines installation success. Examine your walls carefully for:
- Structural soundness: Ensure plaster or plasterboard is firmly attached with no loose sections
- Damp issues: Address any moisture problems before installation—PVC panels trap moisture rather than solving underlying damp
- Surface irregularities: Major bumps or depressions may require filling or battening
- Existing wall coverings: Remove wallpaper, loose paint, and thoroughly clean tiled surfaces
Walls don’t need to be perfectly smooth, but they must be dry, clean, and structurally sound. PVC panels can conceal minor imperfections, but significant wall damage should be repaired first.
Measurements and Planning
Accurate planning prevents costly mistakes:
- Measure your wall area carefully, recording height and width of each wall section
- Calculate panel quantities by dividing total area by individual panel coverage, then add 10% for wastage
- Plan your panel layout: Decide whether to run panels vertically or horizontally (vertical is most common)
- Consider symmetry: Start from the centre of a wall and work outwards for balanced appearance
- Allow acclimatisation: Store panels in the installation room for 24-48 hours before fitting, allowing them to adjust to room temperature and humidity
Safety Considerations
PVC panel installation is relatively low-risk, but observe these safety measures:
- Ensure adequate ventilation when using adhesives
- Wear protective eyewear when cutting panels to prevent plastic dust entering eyes
- Use a dust mask if cutting generates significant dust
- Work from a stable platform when installing at height—never overreach from ladders
- Keep the work area well-lit to ensure accurate cutting and fitting
Step-by-Step PVC Wall Panel Installation Guide
Step 1: Prepare Your Work Area
Clear the bathroom or kitchen of all moveable items and protect fixtures that cannot be removed. Cover baths, sinks, and toilet cisterns with dust sheets or cardboard. Remove electrical socket covers if installing panels around them (ensure electricity is switched off). Clean walls thoroughly, removing dust, grease, and any loose material. Good preparation at this stage ensures better adhesive bonding and cleaner results.
Step 2: Mark Your Starting Point
Using your spirit level, draw a perfectly vertical line from ceiling to floor where your first panel will sit. Most installers begin in the least visible corner of the room, allowing any cut panels to fall in the most noticeable position. If using a starting trim (recommended for neat edges), fix this first along your vertical line. This initial marking is crucial—if your first panel isn’t straight, subsequent panels will magnify the error.
Step 3: Apply Adhesive or Fix Battens
For the adhesive method (most common in UK installations): Apply panel adhesive in vertical strips approximately 30cm apart across the panel back, creating a grid pattern. Don’t apply adhesive right to the panel edges—leave a 2-3cm gap to prevent squeeze-out when pressed against the wall. For the batten method: Fix vertical timber battens (typically 25mm x 50mm) to the wall at 40cm centres, ensuring they’re perfectly vertical using your spirit level. This method works well on very uneven walls.
Step 4: Install the First Panel
Position your first panel against the starting point, ensuring the tongue side (the protruding edge) faces the direction you’ll be working. Press firmly against the wall, starting from the bottom and working upwards to eliminate air pockets. If using the batten method, secure panels with panel pins or staples. For adhesive application, hold the panel in position for 30-60 seconds to allow initial bonding. Check verticality with your spirit level—adjust immediately if needed, as adhesive sets quickly.
Step 5: Continue Panel Installation
Slide the groove of your second panel onto the tongue of the first panel, creating a tight join. Don’t force panels together—they should slide smoothly. If resistance occurs, check for debris in the groove or slight misalignment. Work systematically across the wall, checking every third panel with your spirit level to ensure you’re maintaining perfect vertical alignment. Some installers prefer to loosely position several panels before final fixing to ensure pattern alignment on decorative panels.
Step 6: Cutting Panels to Fit
Inevitably, you’ll need to cut panels around windows, sockets, or to complete a wall. Measure carefully and mark cutting lines clearly with a pencil. For straight cuts, use a fine-toothed saw and cut with the decorative face upwards to prevent chipping. For cutting around obstacles, create a cardboard template first, then transfer the shape to your panel. Cut slightly oversize initially—you can always trim more, but you can’t add material back. For neat circular cuts (around pipes), drill a pilot hole then use a jigsaw or hole saw.
Step 7: Install Corner Trims and Finishing Pieces
Professional appearance depends on proper trim installation. Internal corner trims slide onto panel edges at room corners, creating neat joins and waterproof seals. External corner trims (for boxing around features) provide protective edges and conceal cut panel ends. End caps finish panel runs against walls or fixtures. Apply a small bead of adhesive or silicone to trim backs before pressing into position. Trims should fit snugly but not force panels apart—trim if necessary.
Step 8: Apply Sealant (For Wet Areas)
In bathrooms and shower areas, run a continuous bead of waterproof silicone sealant along all joints where panels meet baths, shower trays, sinks, and floors. Use clear or white silicone appropriate for sanitary applications. Smooth the sealant with a wetted finger or sealant finishing tool, creating a neat, professional finish. Allow 24 hours for sealant to cure fully before exposing to water. This sealing step is critical for preventing water ingress behind panels.
Common Installation Mistakes to Avoid
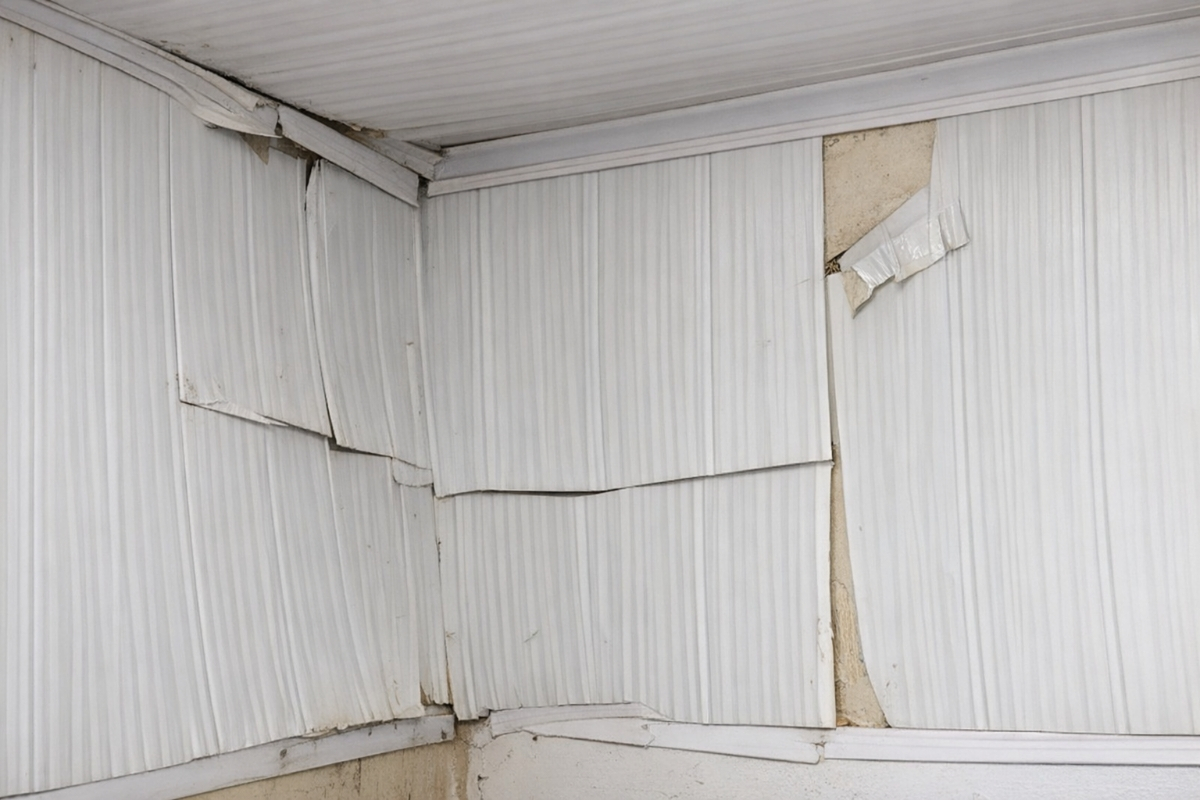
Not allowing panels to acclimatise: Installing panels straight from a cold garage or delivery van can result in expansion or contraction after fitting, causing gaps or buckling. Always store panels in the installation room for 24-48 hours beforehand.
Skipping surface preparation: Installing over damp, loose, or dirty surfaces leads to poor adhesive bonding and eventual panel failure. Taking time to prepare properly prevents future problems.
Incorrect adhesive application: Too much adhesive causes squeeze-out and messiness; too little results in poor bonding and panel movement. Follow manufacturer’s guidelines for coverage rates and application patterns.
Forcing panels together: Aggressive forcing can crack panel grooves or damage tongues. Panels should slot together smoothly—if they don’t, investigate why rather than applying force.
Poor measurement and cutting: The old carpenter’s adage “measure twice, cut once” is particularly relevant with PVC panels. Mistakes in cutting waste materials and create gaps that require additional trim pieces.
Inadequate sealing in wet areas: Missing even small sections of sealing allows water penetration, potentially causing hidden damage. Be thorough with silicone application at all junctions.
Not using a spirit level consistently: Assuming subsequent panels will self-correct if early panels are slightly off-vertical is a recipe for obvious misalignment by wall’s end. Check regularly throughout installation.
Maintenance and After-Installation Care
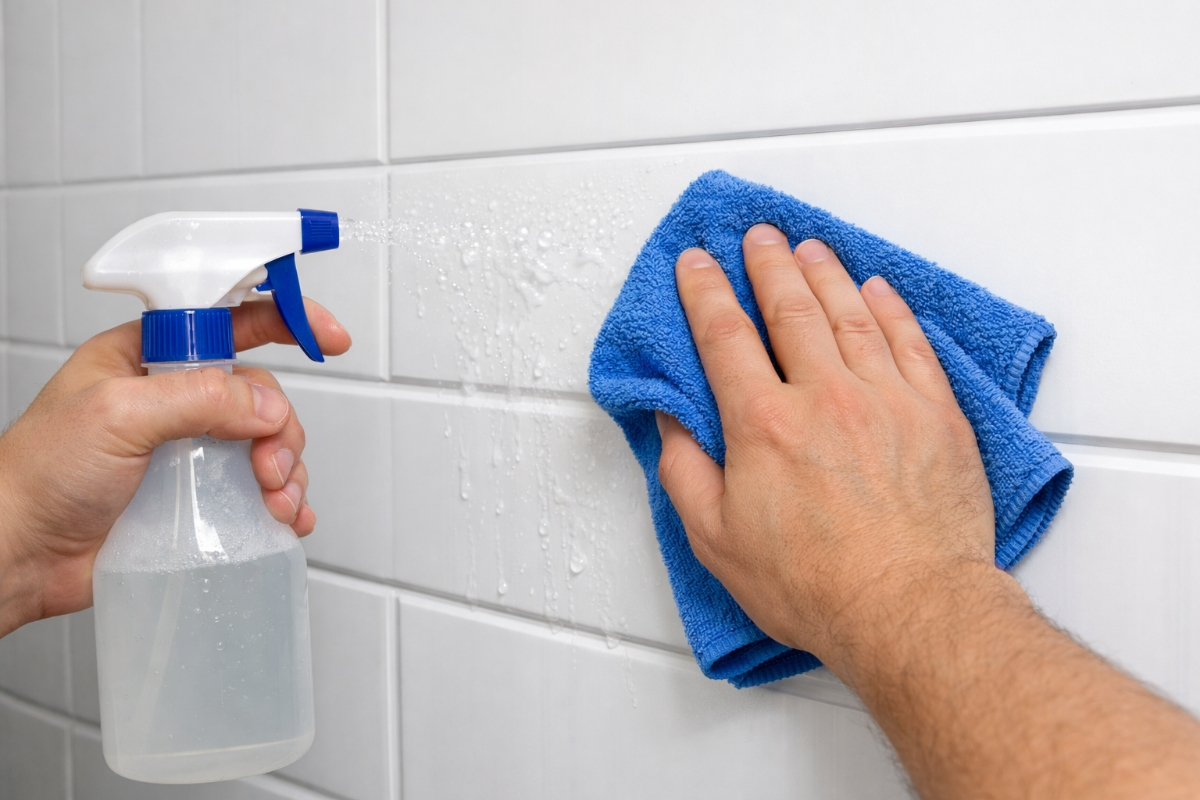
Regular Cleaning
PVC panels require minimal maintenance to maintain their appearance. For routine cleaning, wipe panels with a soft, damp cloth and mild washing-up liquid diluted in warm water. Avoid abrasive cleaners, scouring pads, or harsh chemicals like bleach, which can dull the panel surface over time. For stubborn marks or limescale in hard water areas, use a cream cleaner specifically designed for plastic surfaces. Always rinse with clean water after cleaning and buff dry with a soft cloth to prevent water marks.
Preventing Damage
Whilst PVC panels are durable, following these guidelines extends their lifespan:
- Avoid using harsh chemical cleaners or solvents that may damage the panel finish
- Don’t hang heavy objects directly on panels—use appropriate wall fixings that anchor into the wall behind
- Maintain good bathroom ventilation to minimise excessive condensation
- Keep sharp objects away from panel surfaces to prevent scratches
- Be cautious with heat sources—PVC can soften if exposed to high temperatures
Long-Term Care
Annually inspect silicone seals around baths, showers, and sinks. Re-seal any areas showing signs of deterioration. Check panel edges for any water ingress signs, which might indicate seal failure. If a panel becomes damaged, most systems allow individual panel replacement without disturbing the entire installation. Keep spare panels from your original installation for future repairs. With proper care, your PVC wall panels should provide decades of service without requiring repainting, regrouting, or refinishing.
Frequently Asked Questions
Can I install PVC wall panels over tiles?
Yes, PVC panels can be installed directly over existing ceramic or porcelain tiles, provided the tiles are securely attached to the wall. This is one of the method’s major advantages—it eliminates tile removal mess and expense. Clean tiles thoroughly with sugar soap to remove soap scum and grease before applying adhesive. The smooth, non-porous tile surface actually provides an excellent substrate for panel installation.
How long does PVC panel installation take?
A competent DIYer can typically panel an average-sized bathroom (approximately 8-10 square metres) in a single day, including preparation. The actual panel fitting process is relatively quick—it’s the preparation, measuring, and cutting that consume most time. Professional installers might complete the same room in 4-6 hours. More complex rooms with multiple windows, alcoves, or features will require additional time.
Are PVC wall panels suitable for showers?
Absolutely. PVC panels are ideal for shower enclosures due to their 100% waterproof properties. Unlike tiles with grout lines that can harbour mould, PVC panels create a seamless, watertight surface when properly sealed. They’re particularly popular in British bathrooms for shower cubicles and wet room walls. Ensure you apply waterproof silicone sealant at all joints where panels meet shower trays or other surfaces.
Do PVC panels need to acclimatise before installation?
Yes, acclimatisation is essential for successful installation. Store panels in the room where they’ll be fitted for 24-48 hours before installation, standing them vertically if possible. This allows panels to adjust to room temperature and humidity, preventing expansion or contraction after fitting. Skipping this step is a common cause of gaps appearing between panels after installation.
Can you paint PVC wall panels?
Whilst technically possible to paint PVC panels using specialist plastic primers and paints, it’s generally not recommended. The panels’ easy-clean surface and aesthetic appeal would be compromised, and painted PVC doesn’t wear as well as the original finish. If you desire a different colour, it’s better to purchase panels in your preferred shade or consider panel wraps designed specifically for this purpose.
How do I clean PVC wall panels?
Regular cleaning requires only warm water and a drop of washing-up liquid applied with a soft cloth. For tougher marks, use a cream cleaner designed for plastic or laminate surfaces. Avoid abrasive cleaners, scouring pads, bleach, or acetone-based products. The non-porous surface prevents dirt, soap scum, and limescale from penetrating, making cleaning considerably easier than grouted tiles.
What’s the difference between PVC and uPVC panels?
The terms are often used interchangeably, but there’s a technical distinction. PVC (polyvinyl chloride) refers to the base plastic, whilst uPVC (unplasticised polyvinyl chloride) contains no plasticisers and is more rigid. Most wall panels marketed in the UK are uPVC, though manufacturers may label them simply as PVC. Both materials offer excellent water resistance and durability for internal wall applications.
Are PVC wall panels fire resistant?
PVC panels are classified as self-extinguishing, meaning they won’t support combustion without an external flame source. However, they’re not completely fireproof. In the UK, panels used in domestic settings should meet British Standards for fire safety. Always check manufacturer specifications for fire ratings, particularly if installing in commercial premises where stricter regulations apply. Most quality panels meet Class 1 fire rating standards.
How long does it take to install PVC wall panels?
Installing PVC wall panels in an average UK bathroom takes 6-8 hours for DIYers, including preparation and cutting. Professional installers complete the same job in 4-6 hours. Complex rooms with multiple features require additional time.
Can you install PVC panels over bathroom tiles?
Yes, PVC panels can be installed directly over existing ceramic tiles if they’re firmly attached. Clean tiles thoroughly with sugar soap before applying panel adhesive. This method saves time and money by eliminating tile removal.
Are PVC wall panels suitable for shower areas?
PVC wall panels are ideal for showers due to their 100% waterproof properties. They create a seamless, watertight surface when properly sealed with silicone at all joints, making them superior to traditional tiles for wet areas.
Do PVC wall panels need to acclimatise?
Yes, store PVC panels in the installation room for 24-48 hours before fitting. This acclimatisation allows panels to adjust to room temperature and humidity, preventing expansion or contraction that causes gaps after installation.
What adhesive is best for PVC wall panels?
Use waterproof grab adhesive or specifically formulated PVC panel adhesive for bathrooms. Apply in vertical strips 30cm apart. One tube typically covers 1-2 square metres. Ensure adhesive is suitable for wet environments.
How do you cut PVC wall panels?
Cut PVC panels using a fine-toothed saw (minimum 18 teeth per inch) with the decorative face upwards to prevent chipping. For curves or circles, use a jigsaw. Always measure twice before cutting.
Can PVC wall panels go mouldy?
Quality PVC wall panels won’t grow mould as the non-porous surface prevents moisture penetration. However, poor sealing at joints can allow water behind panels, potentially causing mould on the wall underneath. Proper silicone sealing prevents this.
How much do PVC wall panels cost in the UK?
UK PVC wall panels cost £10-£30 per square metre depending on design and quality. A typical bathroom requires £200-£400 in materials including panels, adhesive, trims, and sealant—significantly cheaper than professional tiling.
How long do PVC wall panels last?
Quality PVC wall panels last 15-20+ years when properly installed and maintained. They resist moisture damage, don’t chip like tiles, and maintain appearance without repainting. This longevity makes them cost-effective long-term investments.
Can you use PVC panels in kitchens?
Yes, PVC panels work excellently as kitchen splashbacks and wall cladding. They’re heat-resistant up to 60°C, easy to clean, and provide hygienic, water-resistant surfaces. Keep panels away from direct contact with cooker hobs.
About Author
Written by FloorsToWalls, a qualified carpenter and bathroom fitter with 12 years’ experience installing PVC wall panels across residential and commercial properties in the UK. FloorsToWalls has completed over 200 bathroom renovations throughout Greater London and the Home Counties, specialising in moisture-resistant wall solutions for British homes. Member of the Guild of Master Craftsmen and certified in domestic plumbing and heating installations.
Content Disclaimer
Some parts of the content on this page may have been generated or assisted by artificial intelligence tools to improve clarity, accuracy, and usefulness. We review and edit all AI-assisted content to ensure it meets our quality standards and provides value to you. If you have questions about the information provided or notice any discrepancies, please contact us so we can address them.


")
